Tuesday, September 21, 2010

Fall Colors & More Pots

Ah, the brilliance of aspen foliage. Each day's beauty surpasses the last as green leaves change to yellow gold, orange flame, and stunning red.
Every day the colors intensify beneath an incredibly blue sky.  It's hard to believe it'll end in the next few days, or perhaps in another week, the leaves turning quite suddenly to brown and dropping from the trees.  
As an artist who is deeply moved by the mountain landscape around me, I've been bursting with excitement over the autumn splendor.  If only I could spend every day in the studio, watching the leaves rustle in the breeze, and enjoying a mid-day jog with my puppy companion!  It's lovely to dream...

These are the pieces I finished today:
Tea pot & cups, soup bowl with lid, large goblet, cookie dish.
(It might be fun to take a look back at the previous stage, before I assembled and carved the parts and pieces.)

More condiment servers and a large plate that sits under the small plate:
On second thought, maybe the cookie dish is more of a display for hors d'oevres.
Tomorrow I'll fire my second round of glaze tests (fingers crossed that all goes well) and then I'll bisque these pieces over the weekend.  If my glazes come out satisfactorily, I'll be able to breathe easier...  October is coming quickly!  I can't wait to see what everyone's been working on.  There will be a lot of friendly faces at the opening, since there are fifteen or so artists participating in "For The Table," many of them local clay friends.  One of the regional artists is Tara Wilson.  I had the privilege of watching her throwing & altering demonstration at NCECA '09.

Thank you to the wonderful (and ever-organized) Pam Herring for coordinating this show!

Saturday, September 18, 2010

Before and After

A good friend of mine, Nick, visited me in Colorado in June, 2009.  I was teaching an annual clay workshop in the Breckenridge Arts District called Fire It Up.  Nick found pictures from that visit, and emailed them to me this week.

In a pit firing, like a raku firing, the process itself is a lot of fun.  People often ask how pit firing is different from raku, where pots are also a fired at a lower temperature.  One major difference between the two involves the timing of all the chemical reactions (ie, cool effects).  With raku, chemical reactions are brought about once you remove the piece from the kiln, and with pit firing, all those reactions occur during the firing.  Also, it's common to glaze pots for a raku firing, and for pit firing, the most I brush onto a pot is terra sigilata (a clay slip, aka 'terra sig') if I use anything at all.  The effects of both firings are stunning, but very different.
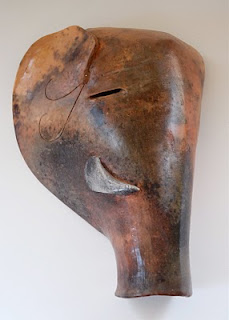
Here I am working on an elephant mask (from that class in 2009).  My friend Rachel is smoothing the bottom of her bird mask.

Texture is important to consider when building a piece for the pit because every indentation or smooth surface remains unchanged through the firing.  There's no glaze to cover up a messy surface.  For the elephant mask, I wanted a smooth, tranquil surface, and I brushed on a warm-hued terra sig to get muted colors.  For the tusk, I used a white terra sig.  White picks up a wide range of colors in the firing: yellows, reds, blues, greens, or grays and black.
I'm demonstrating for Nick that the elephant has its head turned to the side.  One pit firing later, and voila!  I think the mask turned out very well.  I have it available for $60.

Saturday, September 11, 2010

New Pots, New Show

I am part of a wonderful, new group called Summit County Clay. We are enthusiastic about sharing experiences, critiquing current work, and problem solving clay/glaze/design issues. What an uplifting group of gals--innovative, full of energy, and positive. Two of our members have organized an invitational show for our new work (and work from selected clay artists from around the state) to be displayed at Arts Alive Gallery in Breckenridge. It's coming up quickly, on October 2nd!

The theme is pottery for the table. A local weaver is creating beautiful place mats for each of our table settings. Each ceramic artist creates whatever dishes s/he wants to fill the place mat. There's another table for serving dishes appropriate for the main course, side dishes, dessert, and beverages. I listened to traditional ideas tossed around that I hadn't considered: specific servers for asparagus, fish, strawberries and chocolate, and many more. There are so many possibilities... I spent several weeks simply exploring design ideas that I could extend throughout all the shapes I'd want to throw (I even snuck in sketches while serving on jury duty). What an exciting challenge!

As an overall theme, I immediately thought of carving my pieces, but how exactly? I made several test pieces, pursuing different ideas (including the carved bowl and pitcher from my last post). I was still undecided when I sold nearly all of those pieces during the summer art festivals. Only a week ago, I settled on my original idea of throwing my pieces thicker in parts and using a faceting tool to carve away the extra clay. I opened my sketchbook and formed clear ideas to pursue.

Off to the studio... Yesterday I stopped suddenly around noon and snapped off photographs to capture the organized process. There are balls of clay waiting to be thrown, freshly-thrown parts and pieces awaiting to be carved and assembled, and completed work drying slowly.


I find inspiration in moving with intention in every step. I keep track of which pieces I want to make in my notebook so that I prepare all the parts and pieces at once. Then I weigh individual balls of clay. To keep all the pieces coordinated without breaking concentration, I like to label each ball of clay (a wonderful, borrowed idea). By naming the clay, I feel like I'm focusing its energy and encouraging its success, like a gardener whispering to her plants to encourage their growth. Here I'm urging T(ea) cup, L(arge) plate, and T(ea) pot!


Meanwhile, the wet pots are slowly firming up: condiment servers and a small plate on the left; soup bowl lid in the middle; cookie dish, goblet cup, and feet for those pieces are on the right. I like the challenge of throwing each piece as thick or thin as I need it to be later (to carve into the clay).


I'm pretty happy with this soup bowl. Its inspiration comes from the small, lidded bowls my family used for miso soup. (The lid is in the photo above.) As an adult with my own family, I prefer a much larger bowl now, but I want to keep the cherished feeling of presenting a generous and thoughtful surprise for each guest at the table--even when it's obviously soup.

The challenge here is coming up with an idea for the knob on the lid. Time to work with the wet clay is running out... I'll have to make a decision in the next few days.


Finally, we come to the finished pieces! Here are serving bowls, a condiment bowl with a spoon, and three tumblers. I'm glad I took so much time to prepare because I'm happy with the forms so far.
Now it's time to think about glazing... I'm not so excited about this part. I get very frustrated with my glazes sometimes. I first thought about glazing these pieces dark brown with an accent of green/blue, but as lovely as that looks on some forms, I think it doesn't work with all of them.

Moving forward, I've found an interesting glaze combination I used on a vase a few years ago. Although I'm wary of using a single glaze on every single piece, I'd like to try this glaze on a test piece and see what I think. Maybe I can make a quick test piece tonight so that I can bisque fire it when I'm back in the studio Wednesday and start glaze tests as soon as possible!

Sunday, August 8, 2010

New Work, Old Inspiration

I'm having a great summer! I'm grateful that so many people bought my pots at Alma's Festival in the Clouds, and now I have room for more work in the studio. I've been attending to several different projects, as usual, but am making good progress.

One project was for my brother-in-law, for his birthday last week. Almost without exception, I have to form a clear vision of what to make someone when they request a gift. Luckily, Jesse told me exactly what he wanted: a flower pot for a plant that outgrew its old, plastic pot. He knew what size pot he wanted, and he already had a flower pot that would go beside mine.

The last time I made a normal flower pot shape was in high school ceramics, with my wonderful teacher Ms. Benham. The class lasted only one year, but she has stayed in my thoughts ever since. She encouraged me to express myself creatively and inspired me to adopt the attitude that anything is possible, it just takes imagination. I had a blast experimenting with different forms and styles of construction, and then meticulously decorating my pieces with the school's underglazes. Since Jesse's flower pot reminded me of that ceramics class so many years ago, I decided to mostly use underglazes for the decoration. I'm quite pleased with how nicely the pots go together, and I'm proud of myself for completing it on time! I'm usually behind schedule when it comes to gifts...

I'm also working on a dinner set for a show in October with Summit County Clay. I made a few carved condiment servers in July, and last week I started on carved pitchers. They're angled forward and the handle rests on the "butt" that sticks out. I mimicked the posture of the piece and decided it's a bit of a self-portrait of me in a goofy mood. When I demonstrated the posture to my husband, he laughed out loud.

I enjoy carving pieces; there's a similar satisfaction from cutting into the clay as there is in drastic gestures like chopping off 6" of hair or crushing a failed piece, except that carving has a serene quality of movement, like ripples on a lake. I first started to carve pots in the early 2000s after spending time with Yves-Marie, a potter friend in the south of France, about a half-hour from Spain. We'd work in clay all day and drink bottles of Spanish rosé wine in the evening. He throws very large pots and decorates the carved surface with oxides, much different from my style. I was immediately drawn to his technique of carving and have employed it with my own pieces ever since.

My last project is ongoing, creating work for the High Country Music Festival, which is coming up in only a couple of weeks. Thursday and Friday will be the last days for me to make new pieces. I'll bisque them next Sunday evening and glaze fire all day Tuesday so that they'll be ready to pack up for the festival. Priscilla and I will set up our booth on Friday afternoon, Aug 20, and then I'll sit back and enjoy music all weekend! What a plan.

Saturday, July 31, 2010

Where did all the Etsy pieces go?

Yes, I took down my Etsy pieces unexpectedly... I brought them all, plus my new work to Alma for the Festival in the Clouds. This is a wonderful, casual music event the town puts on every year. Alma's website only has three pictures so far; I hope they post more. If you look at the photo with the drum set... that crane is parked behind the house next to mine, so if you imagine turning your gaze to the left.... that's me!

For the past three or four years I've donated ceramics to the Festival in the Clouds, to be given out as door prizes (so that my name gets added to the list of sponsors on the back of the Tshirt) and this year it felt special to have a booth as well. I shared the space with Priscilla Altimari, who I know from the design biz. She designs fantastic handbags from designer fabrics. Yes, I traded her some ceramics for my very own new handbag! I just couldn't resist. It has neutral straw/gold/yellows and fun tassels. Perfect!

Here I am socializing with a young lady who is checking out Priscilla's bags. Totally rocking the bumper sticker I got in my vendor goodie bag. I sold a lot of work, but it felt like I was taking the weekend off because I lounged under our tent, sipping drinks and taking in the music.

August 21 & 22 bring something new to Alma: The High Country Music Festival (check out their site). Priscilla and I are giving the sales angle another go, with fresh items and plenty of enthusiasm. After that I'll make even more pieces, both for Etsy and for a new space in Frisco I'm going to be involved with. Details to follow... For now, I think I have my hands full! I can't keep up with documenting my studio work, but I promise to share some photos very soon.

Saturday, May 22, 2010

Spring Projects

I'm looking forward to starting a glaze firing tomorrow morning! I have several projects to finish up which feel long overdue. Maybe it's because I recently took time off to visit my parents and enjoy their humid spring and neon green flora, but suddenly I feel like I've been producing and producing, without wrapping anything up!

Here are some of the fun items I'll fire tomorrow.....

First, there are large mugs for sipping tea that will go to the Backcountry Herbal Apothecary in Frisco. I added the company's logo image sans text. I just mixed up the glaze, and if all goes well, it'll end up sage green with brown accents.

The casserole dish is a custom piece for a designer and friend from my days working with blinds and draperies (hence the drapery tassel "handle"). I let it dry sloooooowly, over three weeks, just to be safe. I'm really excited to see the results: the red-looking glaze will turn blue, and the tassel will be more wine-colored with blue accents.

I put the plates on the back burner because they're "just" for my husband, and I've had more pressing priorities. Also, our outdoor pet (Linden the fox) somehow got into the garage and jumped on two of the five plates, breaking the rims. Bad pet! I threw a replacement plate a few weeks later, and I think it fits with the style of the others. They will all be the same deep brown and blue color scheme as the tumblers and salad plates I put on Etsy recently. In the middle of the plates I pressed to make shallow swirls, and that part will be the blue.

At long last, I'm moving forward with my "Poppy Reiki" vase. I was inspired by a dear friend who is a Reiki Master. She says that she came upon a poppy bud one day and performed Reiki on it for fun, and.......yes, you guessed it, the bud opened into a flower! I love this story, even if it is improbable, and made the vase very narrow (depth-wise) so that it would seem like a book to shelve, thus documenting the sweet story in the banks of my life's experience. I constructed this vase in 2009 and only today applied underglaze to the incised drawing. After I fire it to cone 6 and vitrify the clay, I'll apply a low-fire liner glaze on the inside and rim and fire it again.

For my show in July I've started making masks to hang on the walls. I think the colorful effects on my masks that I'll get from a pit fire will complement the black and white photography that will be hung as well. Who knows what pieces I'll make for the pedestals, but I'll think of that when the masks are done. I just finished teaching pit firing classes for the Arts District of Breckenridge, and of course I had my students make masks as well. I love sharing inspiration with a group of clay folks and feeling the positive, creative energy we generate together!

In the spirit of Spring, I've had plants and new growth on my mind. I don't know what I set out to do here, but I just finished a planter with an eye, nose, mouth, ear, and open hands. I can't wait to fire it and decide which plants I want to emerge from the openings! It's about 17" tall and 15" wide. Clockwise from the front are stylized hands, an ear, a mouth (just looks like a slit from this angle, but those are actually the bottom teeth), an eye, and a nose. The holes scattered like seeds at the bottom are for drainage. Everything opens upward except the nose, which I can imagine a vine or spider plant shoot crawling out of...

On to the next project!

Thursday, April 29, 2010

We're Live!

My web site is up and running: www.wild-iris.com. Take a look! There are photos of finished pieces (something I don't do here much) plus a link to this blog so I can share my process from inside the studio. Since I take a different approach to pieces if they are to be utilitarian or not, I've separated my work into "sculptural" and "functional" sections. Under the "functional" tab, I'm starting a "pots in action" gallery of photos. If you send in a picture of your Iris pottery in use, I'll gladly add your photo to the array! Don't forget, Everything tastes better with ceramics!

From the new site, I have a link to my Etsy store so you can make ceramic purchases any time of day or night! I also have an official bio page, and my email is accessible from every page. Click on the icon of a present and you'll discover how to purchase Gift Certificates.

There is a section of events I have planned and what I've been involved in recently, as well as where I regularly offer items for sale. For example, I make teapots and tea cups for the Backcountry Herbal Apothecary in Frisco. The last teapot I dropped off there is on my web site's home page. I'm making some mugs with their logo for people to drink tea from while they wait. Alternately, I have colorful hand-built tumblers and plates at Magical Scraps Boutique. I enjoy creating items specific to each business. I look forward to meeting with the owner of Magical Scraps soon to determine what new pieces she wants in her store.

Let me know what you think, and what you'd like to see more of! Many thanks to Mountain Porcupine Design for the site.

Wednesday, March 10, 2010

Growing My Itsy Bitsy ETSY store!

It's finally here... An easy way to buy ceramics! Take a look at what I have up right now. I'll add more work as I take more pictures.

WildIrisClay.etsy.com

If you like a certain piece I've shown here, and it's not featured at Etsy, please contact me and I'll let you know if I haven't listed it yet, or if I've sold it but have similar pieces.

I've been working on the wheel in the Arts District for the past few months, doing throwing demonstrations and assisting drop-in students to complete their projects. Therefore, my next round of etsy additions will be thrown bowls, tumblers, vases... In February, I did throwing demos for the Second Saturday Art Walk in Breckenridge, and completed a set of dinner plates. They will replace (at long last) the boring Target plates we usually use. I can't wait!

Here are three locals excited about clay:

Friday, February 26, 2010

Recommended Reading

After much anticipation, the great American novel, Karmic Relief, has been released online. I am excited to finally have it in a format that I can share with everyone. Please check it out at authonomy.com. However, if you find it tiresome having to log onto the internet to read it, just comment below for me to email you the text document.

I would love your feedback. The best way is for you to leave comments on the site where it's posted. You can also post comments here, or follow the "Complete Profile" link to send an email.

Thanks, and happy reading!
-Piers

Friday, February 19, 2010

TV Interview

The day we hung the show in January, Brad from Channel 10 came by to interview Marshall, since he was the resident artist at the Tin Shop in the Arts District. I happened to be there when they set up the shots, and asked me if I'd want to be interviewed as well. I definitely winged it, but I had a good time too (although I was completely nervous)! Here is the video - I hope my part is amusing and also informative!
Click here to play the video

Monday, February 15, 2010

Collaboration

I really enjoy Valentine's Day - not so much for the romantic aspect, but for a chance to appreciate and love my family and friends. This year, Piers has been building shelves for my studio, and I am very grateful! We also continue to collaborate on pieces; I had a show in January at the Breckenridge Theatre Gallery, and was very excited to show two Piers-Iris pieces. "Servitude" was completed in 2009, and "Gratitude" in 2010. Here they are in the window of the gallery:

1. Gratitude 2. Servitude - both pit-fired by Iris and then Piers uses found wood and objects to complete the pieces. Gratitude is attached by leather laced through the back of the clay and hangs off two nails on the vertical piece of wood. The handle for Servitude is secured with nails. The clay piece has a round bottom (as does Gratitude) so Piers cut a circle out of the wood to hold it. Beneath the wood are three rocks, secured with nails.

Here are more pieces. Thanks to everyone for coming; it was a fun show. Marshall Elliott had work on the walls - he works with burnt fabric. Most of my pieces have buttons, and Jenn (who organizes these events) recognized that our art would work nicely together.


Last year around Valentine's Day, Piers made me a small storage cabinet in our room, so that what he considers my "clutter" can be hidden away, yet still organized. He calls it "Sunrise."
As with his other pieces, and those we do together, he often finds objects and wood while walking in our backyard. The front of the cabinet swings forward and down; I like how Piers secured it with rusted metal and nails.